CF7 Skins Ready provides a range of useful, pre-defined styles (like evenly spaced columns & several fields on a single line) that can be used for all CF7 Skins forms.
You can use the Ready classes right away without having to write any of your own CSS.
In this article, we explain step-by-step how to build a form using the CF7 Skins Ready class singleline.
singleline
Display fields side-by-side in a single line
You can group several form elements into a single line by simply adding a singleline Ready class to the surrounding parent element.
Tip: Most of the CF7 Skins Ready classes are applied to
LIST-OLelements, while a few of them are applied to aLIST-LIelement.
Example:
Let us have a look at an example form:
Instructions:
In this example, we are looking to add the singleline CF7 Skins Ready class to a LIST-OL element enclosing a group of LIST-LI elements.
1. Starting from initial template
When we begin, we see that we already have an initial template ready for us to use.

While we could use this template when building our forms, for this example form, we will delete most of the existing elements to get to a more general starting point.
Let us delete all three LIST-LI elements, as well as the paragraph and submit button present in the form. You should then have the following form:

2. Adding the singleline Ready class
You can assign the Ready class singleline to the LIST-OL item in one of two ways:
A. Use the dropdown menu to the right of the element
Click on the dropdown menu to the right of the LIST-OL element.
Click Ready Class to see a list of options. From the available list, choose singleline (your desired Ready class).

Tip: Ready classes which are not permitted on a particular element are automatically disabled.
B. Use the edit dialog box
Click the edit icon ![]() on the
on the LIST-OL element. Then, check the Ready class you want from the dialog box that appears in the sidebar.

Wherever you work, changes will appear instantly in both locations.
3. Adding required form elements
Now, drag and drop the form element you want under the LIST-OL.
You can drag and drop elements from the sidebar to the Visual builder. If you do not know how to do this, read our CF7 Skins Visual tutorial.
A. Firstly, add the Short Text element.

You will see that a
LIST-LIelement will automatically be created for you when you add any form element under aLIST-OLelement.
B. Now, click on the edit icon ![]() and change its name and label using the Edit element sidebar.
and change its name and label using the Edit element sidebar.

C. Now, you can add the other form elements as required under the LIST-OL. For this example form, we will add one more form element – an email field.

Note: You can always use our duplicate feature to simply copy your fields, and then change the form element as you need.
4. Add form legend and finish up
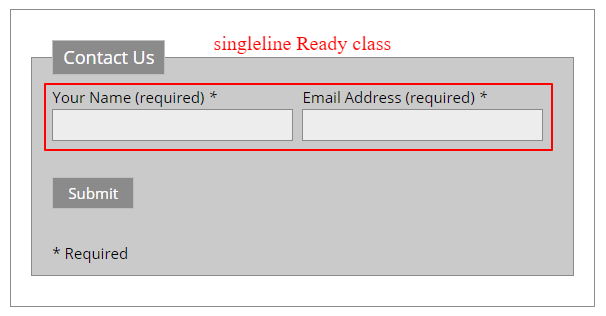
Finally, you need to edit the Legend at the top to name the form.

You are all done. Now, just press the Save Visual button. Here is the final form image you should have:

The last thing you need to do is to choose a style that you want. If you want more choices in themes, you can get a lot more selections with our Pro Version.
CF7 Form Code
Your final form code should look something like this, at the end:

You can still use the traditional CF7 form editor to build the form. To do that, you will have to append the CF7 Skins Ready class name “singleline” to the surrounding
LIST-OLtag.
<fieldset>
<legend>Contact Us</legend>
	<ol class="singleline">
		<li>Your Name [[text text-233]]</li>
		<li>Your Email [email email-706]</li>
	</ol>
</fieldset>
Tip:
- Fields within singleline are automatically evenly spaced by CF7 Skins Ready. If you want more control over individual field widths you should use the grid Ready Class.
- CF7 Skins uses Fieldset, Legend & Lists as the foundation of all CF7 Skins forms.
- It’s a really good idea to use tabs to keep all your fields indented to show how they are grouped.