How do I export a Contact Form 7 form

Sometimes, you may need to duplicate a Contact Form 7 (CF7) form on your current website to another website.

Manually copying the form can be time-consuming and prone to human errors. CF7 Skins now offers a better way to duplicate a Contact Form 7 form across multiple websites by exporting it from one website and importing it into another.

To export a CF7 form, you must:

1. Enable Export in CF7 Skins Settings
2. Export Contact Form 7 form

Enable Export in CF7 Skins Settings

The feature to export a CF7 form is disabled by default. Therefore, you need to make sure that exporting is enabled in CF7 Skins Settings before exporting a form. To enable export:

1. Go to Contact >> CF7 Skins Settings.

Tip: You need WP Administrator level access to go to the CF7 Skins Settings page.

2. Select Enable export of individual CF7 Skins form.

Enable export in CF7 Skins Settings

3. Click Save Changes.

Tip: You can now export & import individual CF7 forms on your websites or share the exported files with your colleagues to help them create the same form on their websites.

Export Contact Form 7 form

After enabling export, you can export a CF7 form using the following steps:

1. Go to your Contact Form.

2. Click Export Form.

Export Form button

Tip: The Export Form button is only displayed if you have enabled export in your website.

3. Provide a name for the exported file and click Save.

Save exported file

Tip: Make sure you give the exported file a name that clearly identifies it & save it in a location where you can easily find it again.

Further reading

How do I add a CF7 Skins Add-ons License

Before adding a new license, make sure you purchase and install a CF7 Skins Add-on. After installing an add-on, follow these steps to add a new license:

1. Get your License Keys
2. Activate the License Keys on your website

1. Get your License Keys

You can get your license keys in two different ways:

a. From the Purchase Receipt
b. From your CF7 Skins account

Get your License Keys from your Purchase Receipt

After you purchase a CF7 Skins Add-on, you receive a Purchase Receipt on:

1. The Purchase Confirmation page.

License Key in Purchase Confirmation

2. Your Email inbox.

License Key in Email

Copy the License Key for the add-on that you want to activate on your website.

Tip: If you are having trouble purchasing CF7 Skins Add-ons, refer to How do I buy CF7 Skins Add-ons for a detailed step-by-step guide on purchasing add-ons.

Get your License Keys from your Account

To get your license keys from the CF7 Skins account:

1. Go to CF7 Skins Account and login.

2. Click View Licenses for the add-on that you want to activate on your website.

View Licenses in CF7 Skins Account

3. Click the corresponding Manage Sites link.

Manage Sites selected in the Purchases page

4. You can now see your License Key at the top of the page. Copy the license key.

License Key in Manage Sites

Tip: You can quickly authorize your website license here by entering the URL of your website on the provided textfield and clicking Add Site.

2. Activate the License Keys on your website

To add the license key on your WordPress website:

1. Log in to your website and go to Contact >> CF7 Skins Settings.

CF7 Skins Settings

2. Select the Licenses tab.

Licenses tab in CF7 Skins Settings

Tip: You can see the Licenses tab only after you install the CF7 Skins Pro plugin.

3. Paste the previously copied License Key.

Adding License in the Licenses tab

4. Click Save Changes.

Save Changes in the Licenses Tab

Tip: Make sure you click Save Changes after adding a license key before Activating the license.

5. After saving the license key, click Activate License to activate the newly added license.

Activate License Key

You can now see the active status for the newly added license with the plugin name, license key, and the authorized website URL.

Active status of a license

How do I create CF7 Skins account

Although you can purchase and use all CF7 Skins Add-ons without a CF7 Skins account, we highly recommend you to create an account. With a CF7 Skins account, you can:

  • see a list of all your previous and pending purchases from the Account page.
  • re-download the purchased packages at any time in the future.

Creating a CF7 Skins Account

1. Go to the CF7 Skins Account page.

2. Scroll down to the Register section.

3. Enter a Username, Email address, Password, and Confirm your password.

Register - CF7 Skins Account

4. Click Register.

5. Go to the inbox of the provided email address and verify your email.

Tip: You can also create an account while purchasing CF7 Skins products. For details, refer to our FAQ on purchasing CF7 Skins add-ons.

Now, you can enjoy the advantages of having a CF7 Skins Account. To view your CF7 Skins Account, go to the Account page and log in with your credentials.

How do I buy CF7 Skins Add-ons

CF7 Skins Add-ons enable you to enjoy a range of advanced features that can take your Contact Form 7 forms to the next level.

Buying CF7 Skins Add-ons

When you have decided which CF7 Skins Add-ons or Bundle you want to buy, follow these steps:

1. Go to the Pricing page. Click the Buy button for the Add-on or Bundle you want – the package is now added to the cart.

Buy button in the Pricing page

2. You will be redirected to the Checkout page where you can verify the items in the cart.

CF7 Skins Cart

Tip: You can add multiple packages to the Shopping Cart by going back to the Pricing page and clicking Buy.

3. You can opt to complete your purchase at a later time even if you don’t yet have a CF7 Skins account. Clicking on Save Cart will generate a link that you will be able to use to continue your purchase in the future.

4. Scroll down to provide a payment method and your personal information. You can also create a CF7 Skins account here if you like.

CF7 Skins Payment method

If you selected Credit Card as your payment method, enter the card and billing details.

5. Click Purchase to get your Purchase Confirmation. Now, you have completed the purchase.

CF7 Skins Purchase Confirmation

Tip: If you selected Paypal as your payment method, you will be redirected to your Paypal page to confirm the payment.

After you complete a purchase, you will receive emails with the purchase receipt and information including purchased items, download links, license keys, and documentation.

If you created an account while completing the purchase, you will be able to download the CF7 Skins Add-ons at any time from the CF7 Skins Account page.

Tip: For a more detailed step-by-step guide, see Purchasing CF7 Skins Add-ons.

Further reading

How do I download plugin updates

If you are an existing CF7 Skins customer, you can download CF7 Skins Addons plugin updates at any time and manually install the updates on your website.

How to download plugin updates

1. Log in to cf7skins.com and go to your Account.

2. Under Your Downloads, click the name of the package that you want to download in the Files column.

Download update file from Account

You can manually install the plugin on your WordPress website by selecting the downloaded file at Plugins >> Add New.

Related FAQs:

  1. Can I move my licenses to other sites?
  2. License & Payment information

Why do I have numbers before each form field?

Does your CF7 Skins form look something like this?

Numbers showing before each form field

For CF7 Skins to work, you need to select a CF7 Skins Style and Save your form.

No numbers with default CF7 Skins style

CF7 Skins uses ordered lists as the foundation of all CF7 Skins Templates. When you use a CF7 Skins Template for your form you also need to use a CF7 Skins Style. This ensures the CSS styling used for ordered lists in your WordPress theme is not applied to your CF7 Skins form.

Add a CF7 Skins Style to your form

1. Edit your contact form and scroll down until you see the Skins section. Here, there are the Form, Template, and Style tabs.

cf7skins-menu-empty

Tip: If you have a Template or Style already selected, the names will appear in the red [ ] brackets.

2. Click the Style tab.

cf7skins-style-tab

3. Click Select below the image to choose a Style. The style will now show as Selected and Style:[ ] will have the Style name you chose.

cf7skins-style-berrydelight-selected

4. Once you have selected a style, click Save If you do not save your changes, your new style will not be applied to your form.

cf7skins-style-default-save

Start with the CF7 Skins Default Style

We recommend you begin with our Default Style. This will let you see what your form looks like with CF7 Skins added to your current WordPress theme.

It is also the minimum Style needed to support our CF7 Skins Add-ons: Multi, Ready, and Logic.

f7skins-style-default-view-selected

Related FAQs:

  1. What are Styles?
  2. How do I create a form with CF7 Skins?
  3. Why we use Fieldset, Legend & Lists in CF7 Skins

What happens if I don’t renew my license?

If you do not renew your license, you will:

  • Be able to use the plugin with your current version.
  • Lose access to all plugin updates.
  • Lose access to premium email support.

CF7 Skins will not be disabled, but we cannot guarantee that your old plugin version will continue to work with future versions of WordPress and CF7 Skins.

While we actively maintain our plugins to be compatible with current or recent versions of WordPress, we do not maintain compatibility with older versions for a variety of reasons. One of those reasons is that the use of older versions of WordPress can pose considerable security risks.

Learn more about CF7 Skins Licensing & Payment Information.

I’m unable to update my licensed plugin

If you’re unable to update your licensed plugin, it could be because you have moved your site after installing the plugin.

How to check if your site has an installed plugin

1. Login to your cf7skins.com Account. You will find the list of your purchases there.

2. Under License Keys, click the View Licenses link for the license you are having problem with.

CF7 Skins - Account and view licenses

3. Click Manage Sites.

CF7 Skins - Account and manage sites

4. Under Site URL, look for your website.

CF7 Skins - Account and add URL for new site

If you do not see the current site you’re using on the list, you will need to move your license to the correct site.

If your site does appear on the list, the problem might be something else. Contact us at CF7 Skins Premium Email Support for further help.

Can I move my licenses to other sites?

If you are a current CF7 Skins customer, you can move your license to any other site you own at any time.

How to add a new site URL and move your license

1. Log in to cf7skins.com and go to your Account.

2. Under Your Purchases click the View Licenses link for the license you wish to move.

CF7 Skins - Account and view licenses

3. Click Manage Sites.

CF7 Skins - Account and manage sites

4. At the bottom right of your URLs, click the Add Site button to add your new site URL.

CF7 Skins - Account and add URL for new site

You can also deactivate an existing install to free up a slot for a another site. For example, you can deactivate an install on https://youroldsite.com and reactivate it on https://yournewsite.com.

Tip: If you move your site after you activate your license, you will need to change the site location in your Account to receive update notifications.


Related FAQs:

  1. License & payment information
  2. Can I upgrade my CF7 Skins licenses

Can I upgrade my CF7 Skins licenses?

If you are an existing CF7 Skins customer, you can upgrade your purchase plan at any time.

How to Upgrade

1. Log in to cf7skins.com and go to your Account.

2. Under Your Purchases click the View Licenses link for the purchase you wish to upgrade.

CF7 Skins - Account and view licenses

3. Click View Upgrades.

CF7Skins - Account License View Upgrade

4. Choose which upgrade you want and select Upgrade License.

CF7Skins - Account Upgrade License

When you upgrade, you will pay the difference from your current license. Learn more about our different add-ons and licenses.

Related FAQs:

  1. License & Payment information

How do I get CF7 Skins Account Info

If you are a registered CF7 Skins user, you can easily view your account information at any time. If you don’t have an account, you can create one from the CF7 Skins Account page or while purchasing a CF7 Skins product.

1. Go to CF7 Skins Account & log in with your CF7 Skins email address and password.

CF7 Skins Account Page

2. Your Purchases shows a list of all your pending and completed purchases.

Your Puchases - CF7 Skins Account Info

3. Your Downloads shows a list of purchased add-ons. You can download the files again at any time you want.

Your Downloads - CF7 Skins Account Info

4. Your Profile contains your name, email address, and billing address, which you can edit directly from this page. You can also change your CF7 Skins Account password in this section.

Your Profile - CF7 Skins Account Info

Tip: We recommend you to always register an account at CF7 Skins for the following benefits:

  • You can re-download your purchases at any time in the future.
  • You don’t have to fill in your information on every purchase. CF7 Skins automatically fills your details for you.

Why is my CF7 Skins Style not applied to my form?

For CF7 Skins and any additional add-ons to work, you need to select a CF7 Skins Style and save it.

To apply a style to your form, follow these steps:

1. Edit your contact form and scroll down until you see the Skins section. Here, there are the Form, Template, and Style tabs.

cf7skins-menu-empty

Tip: If you have a Template or Style already selected, the names will appear in the red [ ] brackets.

2. Click the Style tab.

cf7skins-style-tab

3. Click Select below the image to choose a Style. The style will now show as Selected and Style:[ ] will have the Style name you chose.

cf7skins-style-berrydelight-selected

4. To change the Style, click Select on your new choice. It will override your previous Style selection.

Tip: We recommend you begin with the Default Style. This will let you see what your form looks like with CF7 Skins added to your current WordPress theme.

It is also the minimum Style needed to support our CF7 Skins add-ons: Multi, Ready, and Logic.

f7skins-style-default-view-selected

5. Once you have selected a style, click Save If you do not save your changes, your new style will not be applied to your form.

Tip: You only have to click one save button, not all of them. To update the Style or Template, you can click any Save button. To update the Form tab visual editor, you must click the Save Visual button.

cf7skins-style-default-save

In the example image above, the red text Style: [ Default ] is to show your chosen style without having to go back to the Styles tab. Template: [ ] has no name because a Template has not been selected.

Related FAQs:

  1. What are Styles?
  2. How do I create a form with CF7 Skins?

What does CF7 Skins do?

CF7 Skins makes it easier for regular WordPress users to create advanced and beautiful forms without knowing HTML or CSS.

Extending the power of Contact Form 7, CF7 Skins provides you with a form Template, the ability to quickly customize it using a visual Form Editor, then make it beautiful by choosing a Style.

Templates

Templates are the structure of your form, providing the content and layout. They act as an easy to follow guide that can be adjusted to your particular needs.

cf7skins-templates-top-row-view

CF7 Skins offers commonly used form templates such as a Contact Form, Event Registration, Customer Survey, etc.

Form Tab – Visual Form Editor

The CF7 Skins Form tab provides a visual editor for your form. It is to help you create the form you want without knowing or having to type the form tag syntax required by Contact Form 7.

You can drag and drop, add, remove, copy, and edit fields quickly in one area.

cf7skins-visual-contactform

Each time you edit and save the visual editor, the tags are automatically created and updated in Contact Form 7.

Contact Form 7 form editor showing the CF7 Skins Contact Template

Styles

Styles are different themes and visual aesthetics for your form. You can select a Style and have your form become instantly beautiful without knowing any CSS.

cf7skins-styles-top-row-view

Each Style covers the full range of standard form elements available within Contact Form 7.

For advanced WordPress users, the ID and Class attributes for each field can be edited in the visual editor for each field tag and item.

CF7 Skins

The Visual EditorTemplates, and Styles provide ‘Skins’ for Contact Form 7, hence the name ‘CF7 Skins‘.

CF7 Skins makes it easier for regular WordPress users to create advanced and beautiful forms, using Contact Form 7, without knowing HTML or CSS.

Related FAQs

  1. What are Templates?
  2. What are Styles? 
  3. How do I create a form with CF7 Skins?

How does CF7 Skins differ from Contact Form 7?

Contact Form 7 provides the platform to create forms. CF7 Skins provides the building blocks to quickly and easily produce beautiful, advanced forms.

Contact Form 7 is one of the most downloaded, free WordPress plugins. It allows you to create and embed forms into your WordPress powered website.  While basic forms are easy to create and implement – creating complex forms and getting them to look how you want does require a high level of skill.

CF7 Skins provides pre-built form Templates and visually aesthetic Styles that are customizable through a drag-and-drop Visual Form Editor.

In a few minutes, you can go from the basic Contact Form 7 contact form (left) to a customized CF7 Skins contact form (right) without being an experienced WordPress user, skilled at using HTML and CSS.

cf7-to-cf7skins-contactform

If you are experienced, CF7 Skins can speed up your form creation without losing any functionality or capabilities of Contact Form 7.

Related FAQs:

  1. What does CF7 Skins do?
  2. What are Templates?
  3. What are Styles?

What are Templates?

CF7 Skins Templates are the structure of your form, providing the content and layout. They act as an easy to follow guide or framework that can be adjusted to your particular needs.

The Template tab includes a range of commonly used form templates for different categories and purposes – such as a Contact Form, Customer Survey, Event Registration, etc.

cf7skins-templates-top-row-view

When you select a Template, it’s like getting a head start. The CF7 Skins visual form editor (Form tab) and Contact Form 7 tags are automatically updated for you.

Below is an example of the Contact Form Template on the Form tab.

cf7skins-visual-contactform

With the structure of the form provided, you can immediately start to customize it. Add, edit, duplicate, or remove fields without worrying about tags or typing out the field syntax correctly.

To get started finding a template for your form, within the Skins section, click the Template tab.

cf7skins-template-tab-open

To save your template,

1. Click the Form tab. This tab shows the visual editor for your new form.

2. At the bottom, click Save Visual.

cf7skins-form-editor-save-visual

You can change your template at any time by revisiting the Template tab and selecting a new one.

Related FAQs:

  1. How do I find & select a Template?
  2. What is the Form tab?
  3. How do I edit my CF7 Skins Form?
  4. How do I preview what my form will look like?

How do I find & select a Template?

Find and select a template for your form all within the CF7 Skins Template tab.

Select your Contact Form from the admin panel.

WordPress Admin - Contact Form Plugin

Scroll down to the Skins section. Click the Template tab to begin exploring.

cf7skins-template-tab-open

Filter which templates you can see by viewing:

  • All
  • Featured
  • Popular
  • Latest

Sort templates by:

  • Name
  • Date
  • License (show Premium at the top, for example)

Or, Search for a specific Template name.

Below each template screenshot, click Details to learn more about it.

cf7skins-template-contact-details

To choose a Template for your form, click Select. The template will now show as Selected and Template:[ ] will display the template name you chose.

f7skins-template-contact-selected

Once you select a Template, the Contact Form 7 form editor and the CF7 Skins Form tab will automatically update.

cf7-form-editor-template-contact

Contact Form 7 form editor showing the CF7 Skins Contact Template


CF7 Skins - Visual Form Editor - Template - Contact

CF7 Skins Form tab showing the visual form editor for the Contact form template.

To save your template,

1. Click the Form tab. This tab shows the visual editor for your new form.

2. At the bottom, click Save Visual.

Tip: Once you click Save Visual, any changes made in CF7 Skins (the Form, Template, and Style tabs) will be permanent. You only have to click Save Visual (no other save button) to save your changes.

cf7skins-form-editor-save-visual

You can change your template at any time by revisiting the Template tab and selecting a new one.

Related FAQs:

  1. What are Templates?
  2. What is the Form tab?
  3. How do I edit my CF7 Skins Form?
  4. How do I preview what my form will look like?

What are Styles?

CF7 Skins Styles are what make your form look great. ‘Style’ includes things like the color of each title or field, how much space in between text and the edge of the box, and the changes that occur when hovering your mouse over some form fields.

When you select a CF7 Skins Style, the aesthetic design (CSS code) is automatically created and applied to your form.

For example, below is what a standard Contact Form 7 contact form looks like (based on the site’s main theme):

cf7-wp-contactform-plain

After selecting a CF7 Skins Style (and the contact form Template), you can have a completely different looking form without knowing any code:

cf7skins-wp-form-contact-style-sunshine

To get started finding a style for your form, visit the Skins section & click the Style tab.

cf7skins-style-tab-selected-none

To choose a Style for your form, click Select.

Once you have selected a Style, click Save or Save Visual. If you do not save your changes, the Style will not be applied to your form.

You can change your style at any time by revisiting the Style tab and selecting a new one.

Related FAQs:

  1. How do I find & select a Style?
  2. How do I preview what my form will look like?
  3. Why is my CF7 Skins Style not applied to my form?

How do I find & select a Style?

Find and select a style for your form all within the CF7 Skins Style tab.

Edit your contact form and scroll down to the Skins section. Click the Style tab to begin exploring.

cf7skins-style-tab-selected-none

Filter which Styles you can see by viewing:

  • All
  • Featured
  • Popular
  • Latest

Sort Styles by:

  • Name
  • Date
  • License (show Pro Skins at the top, for example)

Or, Search for a specific Style name.

When you find a Style you like, click Details to learn more about it.

cf7skins-style-berrydelight-details

To choose a Style for your form, click Select. The style will now show as Selected and Style:[ ] will display the Style name you chose.

Tip: We recommend you begin with the Default Style. This will let you see what your form looks like with CF7 Skins added to your current WordPress theme.

cf7skins-style-berrydelight-selected

Once you have selected a Style, click Save or Save Visual. If you do not save your changes, the Style will not be applied to your form.

cf7skins-style-berrydelight-save

Tip: To update the Style, you can click any ‘save’ button. To update the Template or any changes on the Form tab visual editor, you must click the ‘Save Visual‘ button.

You can change your Style at any time by revisiting the Style tab and selecting a new one.

Related FAQs:

  1. What are Styles?
  2. How do I preview what my form will look like?
  3. Why is my CF7 Skins Style not applied to my form?

How do I create a form with CF7 Skins?

Once you have downloaded and activated the Contact Form 7 plugin and the CF7 Skins plugin, you are ready to get started.

1. Log in to your WordPress dashboard.

2. Under Contact > Contact Forms, click Add New.

Wordpress Menu - Contact Forms - Add New

3. Scroll down until you see the Skins section. Under Skins, there are three tabs: Form, Template, and Style.

CF7 Skins - Form tab - New form

These tabs are the three steps to creating your own form:

  • Selecting a Template.
  • Choosing a Style.
  • Editing and saving your form on the Form tab (the visual form editor).

4. Click the Template tab.

5. Find a template that most closely represents the fields that you need for your form. Click Select.

Warning: Choosing a template will erase and replace an existing form on your Form tab. We recommend making a copy of the contact form first, just in case you want it back.

6. If you’d like to see some more information on this template, click Details below each template preview image.

CF7 Skins Template Tab

7. Once you have selected a template, click the Style tab. Find a style that you like and click Select.

Tip: We recommend you begin with the Default Style. This will let you see what your form looks like with CF7 Skins added to your current WordPress theme.

CF7 Skins - Style tab

8. After selecting a Template and Style, click the Form tab.

9. On the Form tab, your new template guide and structure is displayed visually, rather than in written tags and code. You can drag-and-drop fields onto the form, up and down to change their order, edit fields, duplicate them, or delete them.

Tip: For more in-depth instructions, follow along the tutorial: Edit your CF7 Skins form (using Visual Editor).

CF7 Skins - Visual Form Editor - Form Only - Template - Contact

10. To save your new form and style, click Save Visual.

Important: You must click Save Visual to save any changes made on the Template or Form tab. You do not need to use any other save buttons on the page.

CF7 Skins - Visual Form Editor - Save Visual Button

11. Once you save the visual editor, a code snippet will appear at the top of the page under the main title of your form. This is called a shortcode.

Contact Form 7 - Shortcode

12. Highlight this code and copy it. Edit the WordPress post/page where you want to have the form.

13. Paste the shortcode into your content where you want your form to appear.

14. On the right hand side under Publish, click Preview Changes to see your form in action.

Wordpress Post - Contact Form 7 Shortcode - Preview

Related FAQs:

  1. How do I edit my CF7 Skins form (using visual editor)?
  2. Where can I get more templates or styles?
  3. How does CF7 Skins differ from Contact Form 7?
  4. What is the form section?

How do I preview what my form will look like?

Before choosing a Template or Style for your form, click on the Details link to get more information about that template or style.

Within details, click on Expanded View to see a larger view of the template or style.

CF7 Skins - Template Details - Click Expand for More

If you want to see what it will actually look like on your website, follow these steps:

1. After selecting a Template and Style for your form, click the Form tab.

2. Click Save Visual.

Tip: You only have to click Save Visual to save your work. You do not have to click any other save buttons.

cf7skins-visualformeditor-savevisual

3. Once you save the visual editor, a code snippet will appear at the top of the page under the main title of your form. This is called a shortcode.

cf7-form-shortcode

3. Highlight this code and copy it.

4. Edit the WordPress post/page where you want to have the form.

5. Paste the shortcode into your content where you want your form to appear.

6. On the right hand side under Publish, click Preview Changes to see your form in action.

WordPress Post - Contact Form 7 Shortcode - Preview

If your not happy with what you see, you can edit your form or select a different style. Your changes will be applied to the form displayed on your post or page.

Related FAQs:

  1. How do I create a form with CF7 Skins?
  2. What are templates?
  3. What are styles?
  4. Why is my CF7 Skins style not applied to my form?

How do I save my CF7 Skin?

To save CF7 Skins (any action on the CF7 Skins FormTemplate, or Style tabs), click the Form tab and click Save Visual.

Important: You must click the ‘Save Visual’ button to save any changes made in CF7 Skins. You do not need to use any other save buttons on the page.

CF7 Skins - Form Tab Visual Editor - Save Visual Button

Once you click Save Visual, the Contact Form 7 form tag editor will be updated and any form style changes will appear on your site.

If you are editing your form in the Contact Form 7 tag editor, you can click one of the other Save buttons on the page.

Now to make your form to appear on your post/page:

1. After you save your form, a code snippet will appear under the main title of your form.

cf7-form-shortcode

2. Highlight this code (called a Shortcode) and copy it.

3. Go back to the post/page you are working on, copy the Shortcode into your content where you want your form to appear.

4. After you Save your post/page, the form will now appear.

Related FAQs:

  1. How do I add a form into a WordPress post or page?
  2. How do I create a form with CF7 Skins?
  3. Why is my CF7 Skins Style not applied to my form?

How do I edit a CF7 Skins Form (using Visual Editor)?

This FAQ is about using the CF7 Skins visual form editor. To edit your form using the Contact Form 7 editor, see How do I edit my CF7 Skins form (using Contact Form 7 editor)?


The CF7 Skins Form tab is where you edit your form.

On the Form tab, the visual editor enables you to make changes to your form without having to know about Contact Form 7 tags and syntax. 

If this is your first time using CF7 Skins and creating a form, we recommend starting with How do I create a form with CF7 Skins?

Once you have selected a Template, click Form to open the visual editor.

Warning: Choosing a template and saving it will erase and replace an existing form on your Form tab. We recommend making a copy of the contact form first, in case you want to revert back to the original.

CF7 Skins - Visual Form Editor - Form Only - Template - Contact

CF7 Skins Form tab showing the visual form editor for the Contact form template.

On the form itself, you can drag-and-drop to re-order the fields or click to edit, duplicate, and delete them.

CF7 Skins - Visual Form Editor - Field Tag Edit Duplicate Remove

All of the available Contact Form 7 form tags and CF7 Skins Items are shown under Fields.

CF7 Skins - Form tab - Contact Form 7 Tags and CF7 Skins Field Items

Re-order Existing Fields

To re-order where fields appear on the form,

1. Click and hold your mouse down on the field’s drag-and-drop box CF7 Skins - Form Tab - Drag-and-Drop Grey Box Icon.

2. Move your mouse to drag-and-drop a field up and down the form.

When moving a field, the editor will show you a blue or red box. Blue means you can move a field to that position, red is when you cannot.

CF7 Skins - Form Tab - Drag and Drop Field Blue SuccessCF7 Skins- Form - Move Field Red Box Unable

Add New Fields

All of the available form fields are under Fields (CF7 Tags) and Fields (CF7 Skins Items).

1. Click and hold down your mouse on a field.

2. Drag and drop it onto your form in the place you would like it to appear.

Tip: A single click on a field will add it to the bottom of your form.

CF7 Skins - Form Tab - Drag and Drop New Field

Edit a Field

1. Click the Edit pen icon CF7 Skins - Form - Edit Field Icon on a field.

2. On the right side, the field’s edit options will appear. Each field has different edit options.

Tip: Any edits automatically appear on the visual editor, but will not appear on your site until you make changes permanent by clicking Save Visual.

Below is an example of what you can edit on a Text field tag.

CF7 Skins - Form - Edit a Field Options

The most common edits on the text field are the field’s label and default value.

Duplicate

1. Click the Duplicate paper icon CF7 Skins - Form - Duplicate Field Icon to make a copy of a single field or an entire set of fields.

CF7 Skins - Form - Duplicate Lists and Fields

Tip: To know what you are duplicating, click the minimize icon CF7 Skins - Form - Minimize Minus Icon beside the field name. Anything that collapses below the field will be duplicated.

Delete

1. Click the Delete x icon CF7 Skins - Form - Delete X Icon to delete a single field or an entire set of fields.

CF7 Skins - Form - Delete Set of Fields or Delete Single Set

Save

To permanently save any changes made in CF7 Skins,

1. Click Save Visual.

Tip: After clicking Save Visual, you do not need to click any other save buttons. You cannot recover a previous version of the form after saving.

CF7 Skins - Visual Form Editor - Save Visual Button

Related FAQs:

  1. How do I preview what my form will look like?
  2. Tutorial: Edit your CF7 Skins form (Visual Editor)
  3. How do I edit my CF7 Skins form (using Contact Form 7 editor)?

How do I edit a CF7 Skins form (using Contact Form 7 editor)?

This FAQ is about using the Contact Form 7 tag editor. To edit your form on the CF7 Skins form tab (using the visual editor), see How do I edit my CF7 Skins form (using Visual Editor)?


When you start a new form in Contact Form 7, at the top of the page is a default contact form in the Contact Form 7 form tag editor:

Contact Form 7 - Default Contact Form

Selecting a CF7 Skins Template will change the HTML tags and Contact Form 7 tags shown in this editor.

If you haven’t selected a Template yet, choose one that has fields closest to what you want in your finished form.

Tip: Each Template is like an easy to follow guide, which you can adjust by moving, adding, copying, and deleting fields.

CF7 - Form Editor - Contact Template

Contact Form 7 form editor showing the CF7 Skins Contact Template

To edit the form, most people find copying, pasting, and deleting lines is the best way to make adjustments.

Remove a field by highlighting the line and deleting it.

Contact Form 7 - Delete Field

Add a field by copying one that is similar, pasting it where you want, then editing the field name. For example, if there is a First Name row, you can copy and paste it then change the label to Last Name.

Contact Form 7 - Add Fields - Copy and Paste

To add a brand new field tag, click a tag name from the tag generator button area just above your form editor. Insert it into your form, then copy and paste it into the correct position.

Tip: The tag will insert itself wherever your cursor was within the editor.

Contact Form 7 - Add New Tag

To know which tags and fields you can add, take a look at Contact Form 7’s Tag Syntax documentation. To check if you are changing the right field or label, try saving the form and previewing it after each change.

Important: If you select one template, edit it, then select another template, the form editor will overwrite any edits that you have made. Exit the page without saving to recover your form back to the last time you saved it.

For a more in-depth tutorial, follow along with Edit your CF7 Skins Form (Contact Form 7 Editor).

Related FAQs:

  1. How do I find and select a Template?
  2. How do I save my CF7 Skin?
  3. How do I preview what my form will look like?

What are the benefits of the CF7 Skins Add-ons?

CF7 Skins Add-ons instantly give you access to powerful, easy-to-use tools for creating and customizing advanced Contact Form 7 forms.

Building custom forms can often take a lot of time and advanced WordPress programming experience. Whether you are a WordPress beginner or expert, CF7 Skins Add-ons make custom form creation quicker and easier for everyone.

Built directly within the Contact Form 7 interface, we offer  add-ons that cover the most common feature requests:

  1. Pro – Access a wider range of common form Templates and choose from dozens more visually aesthetic Styles.
  2. Ready – Add extra structure and style to your form through the use of ready classes. Display fields side-by-side or in columns, surround sections of your form with boxes, and more.
  3. Multi – Create multi-page forms. For long, multi-part forms, complete with pagination, progress bars, a start and an end, and more.
  4. Logic – Add conditional logic on any fields of your choice. For example, hiding or displaying entire sections of a form based on a field response.

All add-ons include:

  • Premium email support with a dedicated support specialist to help with your particular issues.
  • Plugin updates and ongoing support for a full year are included in the price.
  • Activate, deactivate, and move your license from one site to another at any time.
  • Automatic discount when you renew your license.
  • Upgrade or include any add-ons at any time.

You can choose to purchase 1 add-on or multiple add-ons at any time. Be sure to take advantage of our bundle pricing.

Licenses are valid for a full year from your purchase date. If you’re unhappy with your purchase, we will fully refund you within 30 days of your purchase.

You can continue using the free version of CF7 Skins for as long as you like and are ready to upgrade.

For more information, go to CF7 Skins Add-ons.

Related FAQs

  1. Can I upgrade my licenses?
  2. License and payment information

License & Payment information

License

Your license is valid for one year from the purchase date. An active license key is needed for ongoing access to plugin updates and email support. You will need to renew your license to continue receiving updates and support (discounted renewal rates are available.) Check out which licenses and discounts are available.

After purchasing, you’ll receive a Licence Key via email (or you can visit your Account.) The key can be activated from within the plugin or via your account. Keys can also be deactivated from within the plugin or via your account, and reactivated on another site if needed. Learn about moving your licenses.

Support

If you have a current licence you’ll be able to use our Support page to contact us for help. Premium Email Support is provided to handle questions and problems from users with an active license key. See our Support Policy for details on the type of questions we can help with.

Updates

An automatic updater is included with the plugin. In order for the updater to work, you need to have a valid license key linked to the website where the plugin is installed. You can also upgrade or include add-ons before an update.

You will receive notification of plugin updates just like you’re used to with plugins available from the WordPress Plugin Repository. We provide identical update support, although the plugin will be updated from our website instead of wordpress.org.

Note: If you move your site after you activate your license, you will need to change the site location in your Account to receive update notifications. Learn more about how to check if your valid license is connected to the correct site location.

Renewals

When it’s time to renew, you get a discount! Your license can be renewed annually at a substantial discount of the price at the time of renewal. We’ll send you an email in advance of your license expiring with instructions on how to renew.

Payments

Our secure payment methods include Visa, MasterCard and Paypal. We are limited to online payments only, we are not be able to accept a money order, accept checks, or receive phone orders.

Refunds

If you are not happy with our product or service, let us know within 30 days of purchase and we’ll refund you.

Can I upgrade my license later?

Yes – you can upgrade your license and only pay the price difference from your current license. Learn how to upgrade your current license.

Will you automatically charge my credit card for renewal after 1 year?

No – we’ll send you an email before your renewal date with instructions on how to renew at a discount.

What counts as a site?

Any time you activate the plugin license on a site with a new URL, that counts as a site.

However, local URLs (such as localhost, 10.0.0.0/8, 172.16.0.0/12, 192.168.0.0/16, .dev, and .local) do not count towards the activation limits of the license. For example, https://yoursite1.com and https://yoursite2.com counts as two sites since they are hosted URLs. https://dev.yoursite.com and https://yoursite.com counts as only one site.

Can I use the Personal license on multi-site?

Yes – you will need a license for each website on a multi-site on which the plugin is used.

Can I deactivate installs?

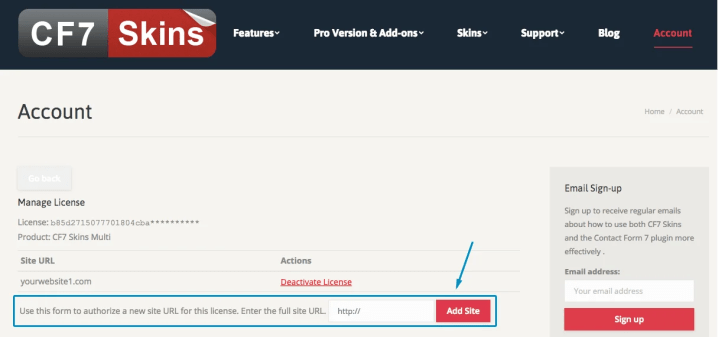
Yes – you can get a list of your currently active installs and deactivate them anytime at your Account.

Does deactivating an install free up a space on my install limit?

Yes – when you deactivate an install, it frees up a slot for a another install. For example, you activate an install on https://youroldsite.com. You then de-activate your install and re-install it on https://yournewsite.com.

Can I move licenses to another site?

Yes – if you move your site after you activate your license, you will need to change the site location in your Account to receive update notifications. Learn more about moving your licenses to different sites.

Do you have a refund policy?

Yes – you can get a full refund within 30 days of purchase – you just need to email us with the premium email support contact information that was provided to you when you paid.

Feel free to contact us if you have other unanswered questions.

Related FAQs:

  1. Can I upgrade my CF7 Skins licenses

What are the Fieldset and List boxes on my Form tab?

Fieldset, legend, and list items are the foundation for all CF7 Skins Templates. They are a key part to the structure and style of your form.

  • The FIELDSET item groups together related form fields.
  • The LEGEND item helps provide context to each fieldset by adding a title.
  • LIST-OL items act like a group of related LIST-LI items.
  •  LIST-LI items act like containers for a form’s field tags (Contact Form 7 Tags), such as Checkbox, Text, Date, etc.

The fieldset at the top provides a title (legend) for the entire form. The list-ol groups together list-li items that are related.

Tip: If you duplicate a LIST-OL, it will duplicate all of the LIST-LI and tags inside. This can save a huge amount of time if you have similar sections on your form.

The main advantages behind using this syntax are:

  • Customization and options for the form layout is both easier and more versatile.
  • Contact Form 7 form tags are visually less cluttered and easier to tweak.
  • Advanced and detailed CSS styling is much easier.
  • W3C compliant.
  • Accessibility such as tabbing navigation for visual user agents and speech navigation for speech-oriented user agents.

Tip: You don’t need to fully understand these items in order to use CF7 Skins. We recommend selecting a Template and following it as a guide.

To see all of the advantages to using fieldset, legend, and list, go to Why we use fieldsets, legends, and lists in CF7 Skins.

For more in-depth explanations on CF7 Skins Items, take a look at the tutorial Understanding fieldset, legend, and list field items.

Related FAQs:

What is the Form section?

The CF7 Skins Form Section

CF7 Skins adds a drag-and-drop visual form editor to the Contact Form 7 plugin interface.

Also known as the Visual Editor, Visual Form Editor, or Form tab, this is where you can edit your form’s content and layout.

CF7 Skins - Full Visual Form Editor - Template - Contact Form

The tree diagram is an interactive, visual representation of your form’s structure. When you select a Template, the form section is populated for you. Each template acts as an easy to follow guide, which you can then customize in this section.

The Fields section has all of the Contact Form 7 tags needed to create your form plus the CF7 Skins items needed for our templates and styles.

Drag and drop fields up and down the tree to re-arrange the order, minimize sections that you are not focusing on, and click or drag and drop new fields onto your form. You can choose to edit, duplicate, or delete any of the fields.

CF7 Skins - Visual Form Editor - Field Tag Edit Duplicate Remove

CF7 Skins retains the original HTML based form editor of the Contact Form 7 plugin interface.

Contact Form 7 Form Section

The Contact Form 7 plugin interface is also known as the Tag editor or Form Tag Editor.

You can edit your form’s content and layout using the Contact Form 7 Admin Screen. Also, here is where you can use HTML tags and create Contact Form 7 form-tags using the tag generator.

Contact Form 7 - Default Contact Form

You may find this useful for making text based tweaks to forms created using the CF7 Skins drag-and-drop visual form editor.

Important: Changes made exclusively in the Contact Form 7 tag editor are not reflected on the CF7 Skins Form tab in the visual editor.

Related FAQs:

  1. How do I create a form with CF7 Skins?
  2. How to add a form to a WordPress post or page?
  3. How do I edit my CF7 Skins form on the Form tab (visual editor)?

Where can I get more Templates or Styles?

Additional form Templates and beautiful Styles are available instantly by purchasing the CF7 Skins Pro add-on.

CF7 Skins Pro, an add-on for the CF7 Skins free plugin, offers the usual free Templates and Styles plus more complex Templates and a huge variety of Styles that can be used with almost any website colour scheme. Additionally, you will have access to Premium Email Support.

For instant access to more Templates, Styles, and Premium Support, follow the steps to upgrade your account:

1. Go to the CF7 Skins Pricing page.

2. Under CF7 Skins Pro, select the package that works best for you. Packages are based on how many site licenses you need. If you have one website, you only need one license.

3. Go through the checkout process.

4. After purchasing, you’ll receive a Licence Key via email (or you can visit your Account.)

Once you have applied your new license key, your new Templates and Styles will be available in the same location as before.

Note: The CF7 Skins Pro Add-on is included when you purchase any other CF7 Skins add-on: Ready, Logic, or Multi. Take a look at the special Bundles to make the most of purchasing helpful add-ons.

Related FAQs

  1. What are the benefits of the CF7 Skins Add-ons?
  2. Can I upgrade my CF7 Skins licenses?
  3. License and payment information

How to add a form into a WordPress post or page?

To add a form to your WordPress post/page, copy and paste the shortcode generated by Contact Form 7 into your post/page.

1. In the CF7 Skins form tab, click Save Visual.

Tip: You only have to click Save Visual to save your work. You do not have to click any other save buttons.

f7skins-visualformeditor-savevisual

2. Once you save the visual editor, the Contact Form 7 form editor will be automatically updated and saved. A code snippet will appear at the top of the page under the main title of your form. This is called a shortcode.

cf7-form-shortcode

3. Highlight this code and copy it.

4. Edit the WordPress post/page where you want to have the form.

5. Paste the shortcode into your content where you want your form to appear.

4. After you save your post/page (for example, by updating or publishing) the form will appear on your live site.

Related FAQs:

  1. What is the Form section?
  2. How do I preview what my form will look like?
  3. How do I save my CF7 Skin?