Once you have downloaded and activated the Contact Form 7 plugin and the CF7 Skins plugin, you are ready to get started.
1. Log in to your WordPress dashboard.
2. Under Contact > Contact Forms, click Add New.

3. Scroll down until you see the Skins section. The Visual Form Editor will be open by default, showing a basic form structure.

Notice that CF7 Skins has 3 main sections: Form, Template, and Style.

- Form, a Visual Editor, is where you edit, build, and save your form.
- Templates are common forms that act like easy to follow guides.
- Styles are the aesthetic visual design of your form — what makes your form beautiful.
Template
1. First, click the Template tab.
2. Look for a template that most closely represents the fields that you need for your form.
Important: Selecting a template will erase and replace anything that is on the Form tab and the Contact Form 7 tag editor. If you are working on an existing form, make a copy of it as a backup.

3. When you are ready to choose, click Select.

After selecting a template, the Visual Form Editor and the Contact Form 7 editor are automatically updated.
Style
1. Next, click the Style tab. Look for a style that you find visually appealing and aligns well with your site’s design.
Tip: To see what a style looks like on all form fields, click Details then Expand. Or, preview your form in WordPress by following the final steps in this tutorial.
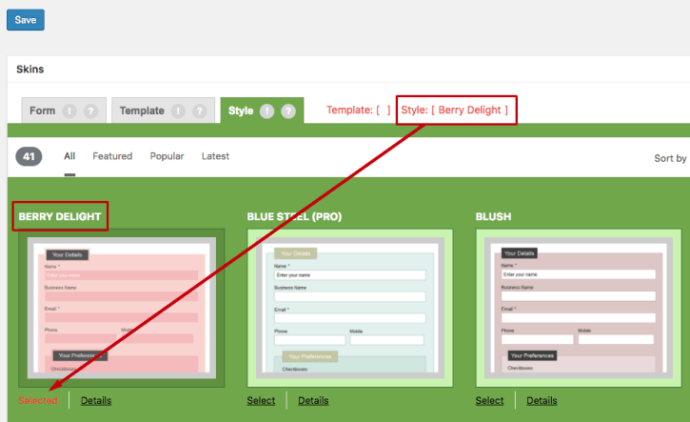
2. When ready, click Select. The design is automatically applied to your form.
You can select and save a new style at any time.
Form (Visual Editor)
1. Click the Form tab. Here, the Visual Editor shows the form that was created based on your selected template.
2. Add new fields by dragging and dropping them onto your form.

3. Edit, duplicate, remove, and change the order of fields within the editor.

You can still use the traditional Contact Form 7 tag editor if you prefer.
4. When ready, click Save Visual.

5. Once you save the visual editor, a code snippet will appear at the top of the page under the main title of your form. This is called a shortcode. Highlight this code and copy it.

6. To add the form onto your WordPress page, edit the WordPress post/page where you want to have the form and paste the shortcode into your content.
7. Click Preview Changes to see your form in action.
